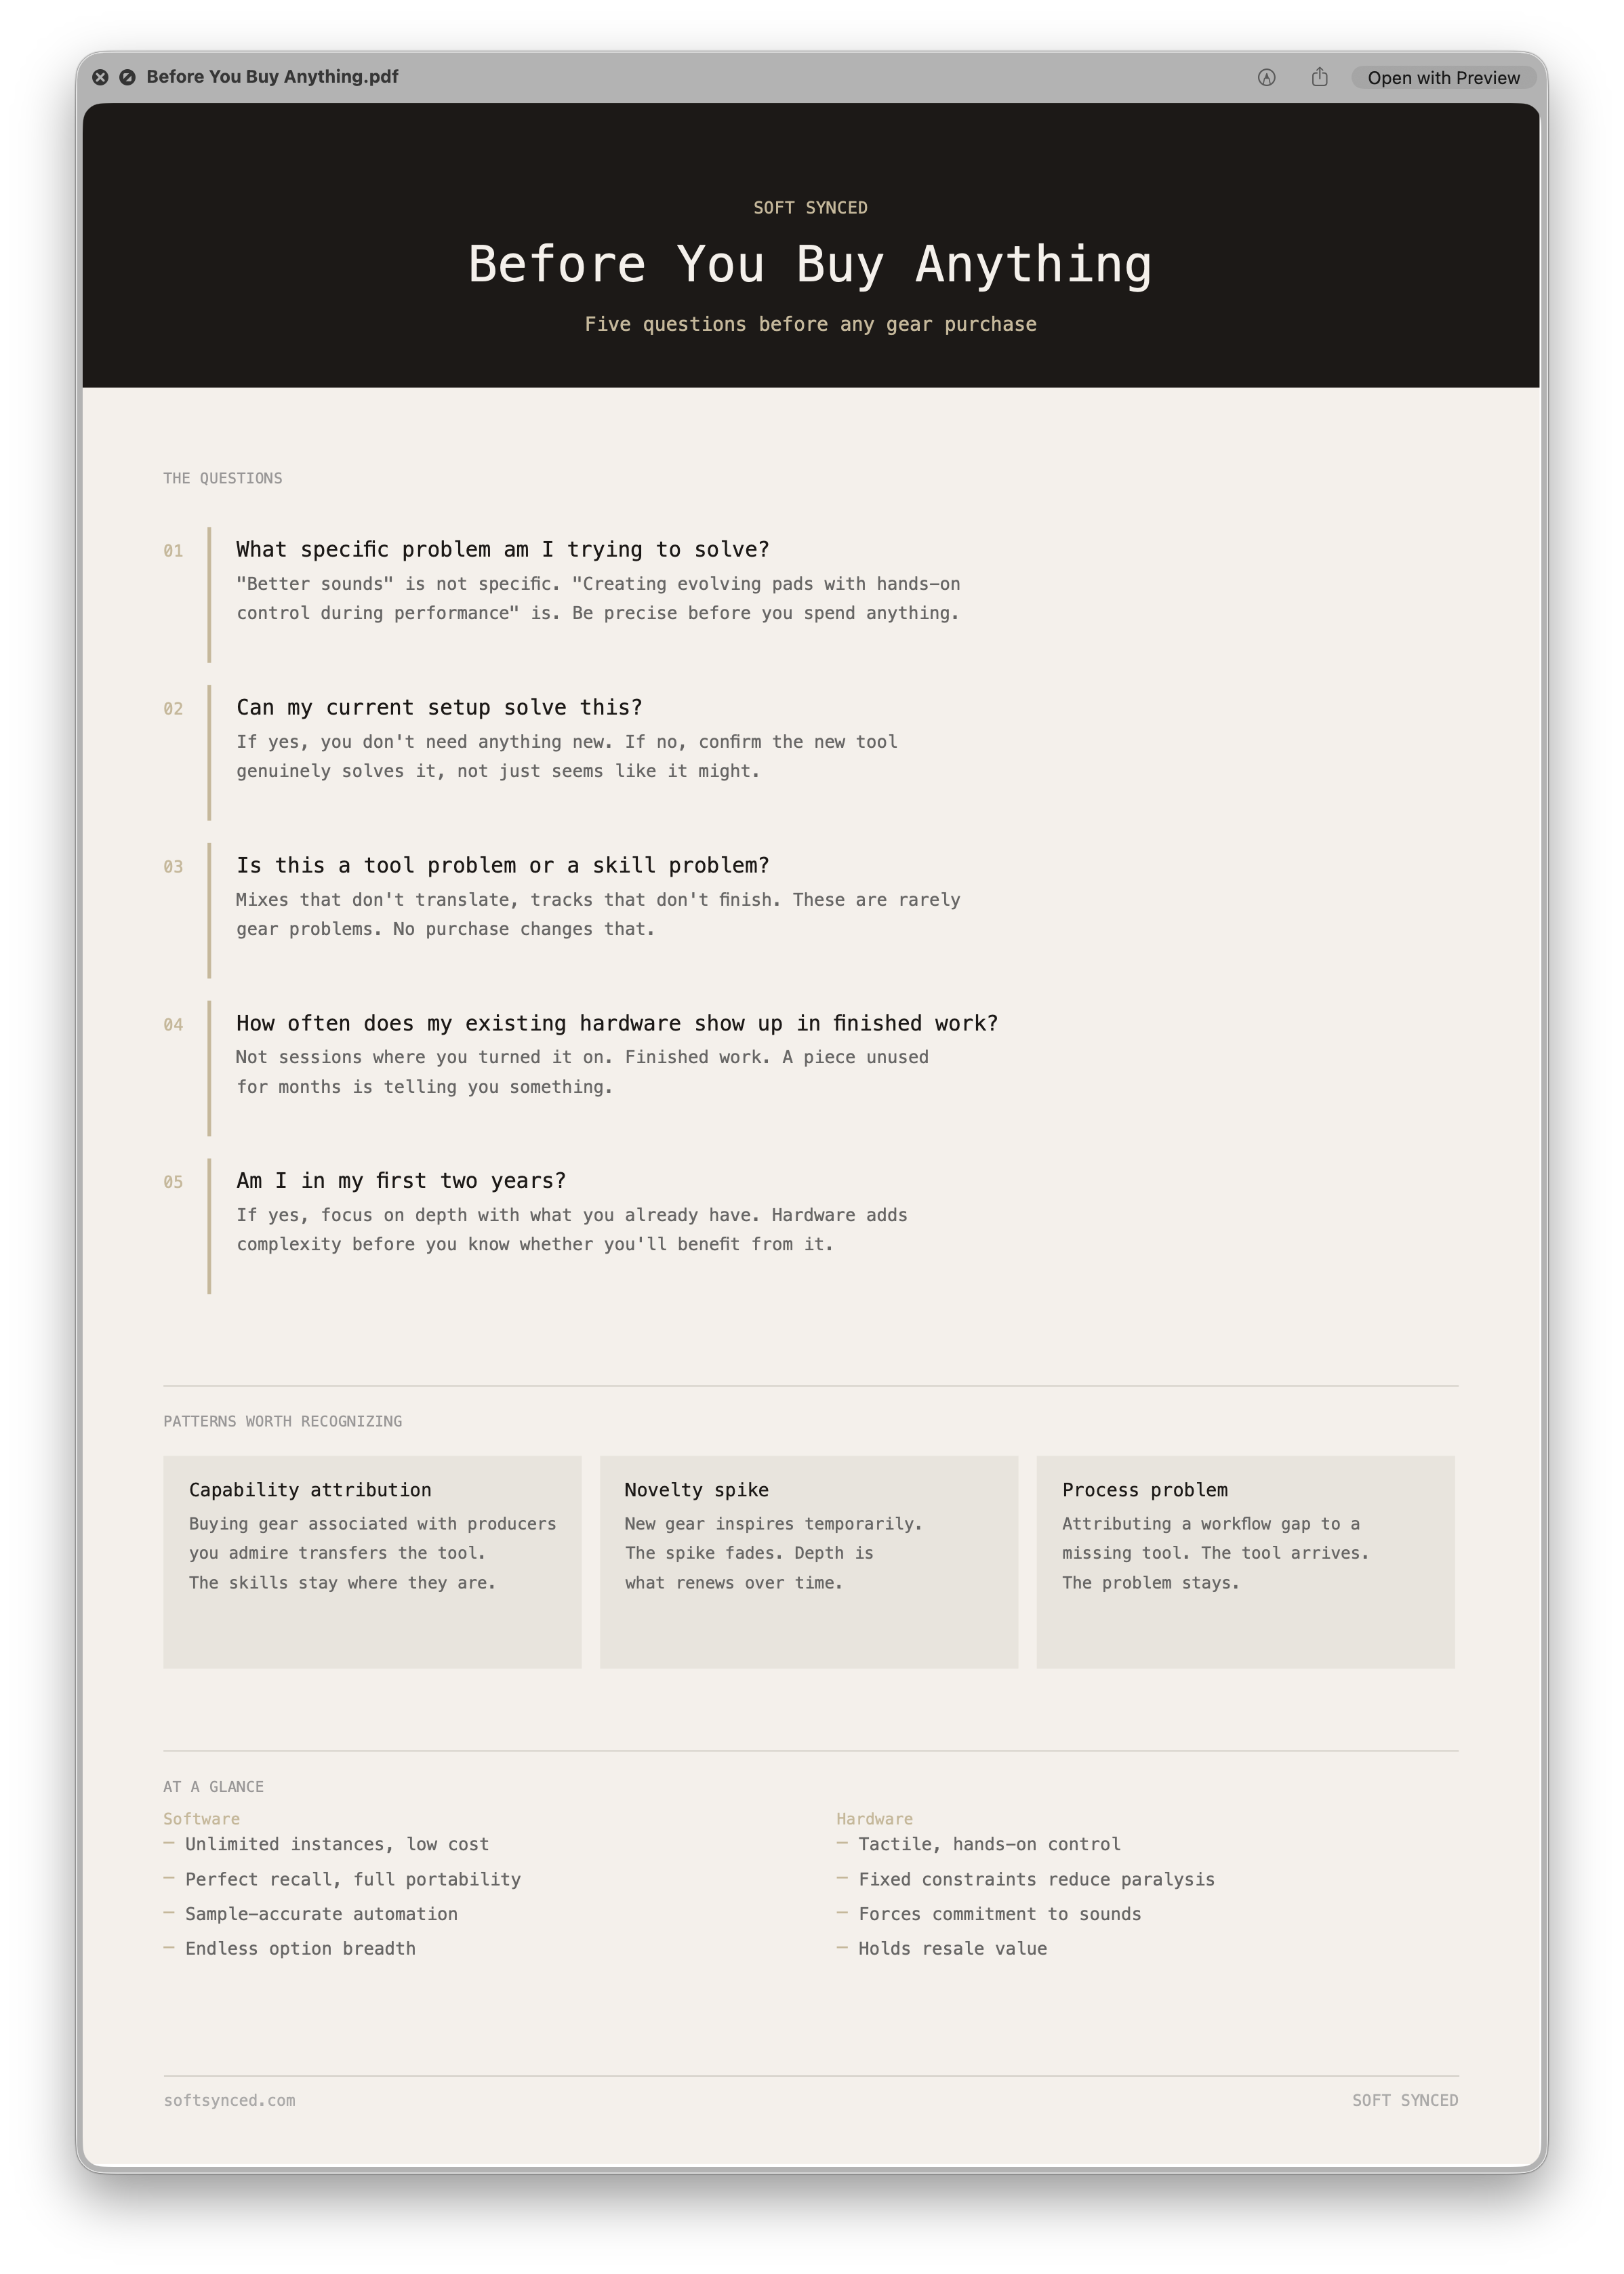
Five questions to ask before any gear purchase.
Most gear decisions feel like capability decisions. They're usually skill decisions in disguise. Knowing the difference before you spend anything is more useful than any buying guide.
This chart maps the five questions worth asking — starting with what problem you're actually trying to solve — alongside the three acquisition patterns that send most producers in the wrong direction: capability attribution, novelty-driven inspiration, and treating a workflow gap like a tool problem.
On the back: a software vs. hardware summary covering what each approach actually offers, stripped of the arguments that don't hold up.
Print it, keep it somewhere visible. It's most useful the moment you start convincing yourself you need something.
Most people who start thinking about getting on a label imagine the same version of events. Someone finds your music, things start moving, and you hand off the rest. That story isn't entirely wrong. It just doesn't describe what most labels actually do.
The gap between expectation and reality is where a lot of time, money, and momentum goes. Understanding what a label will and won't do before you approach one changes the conversation.
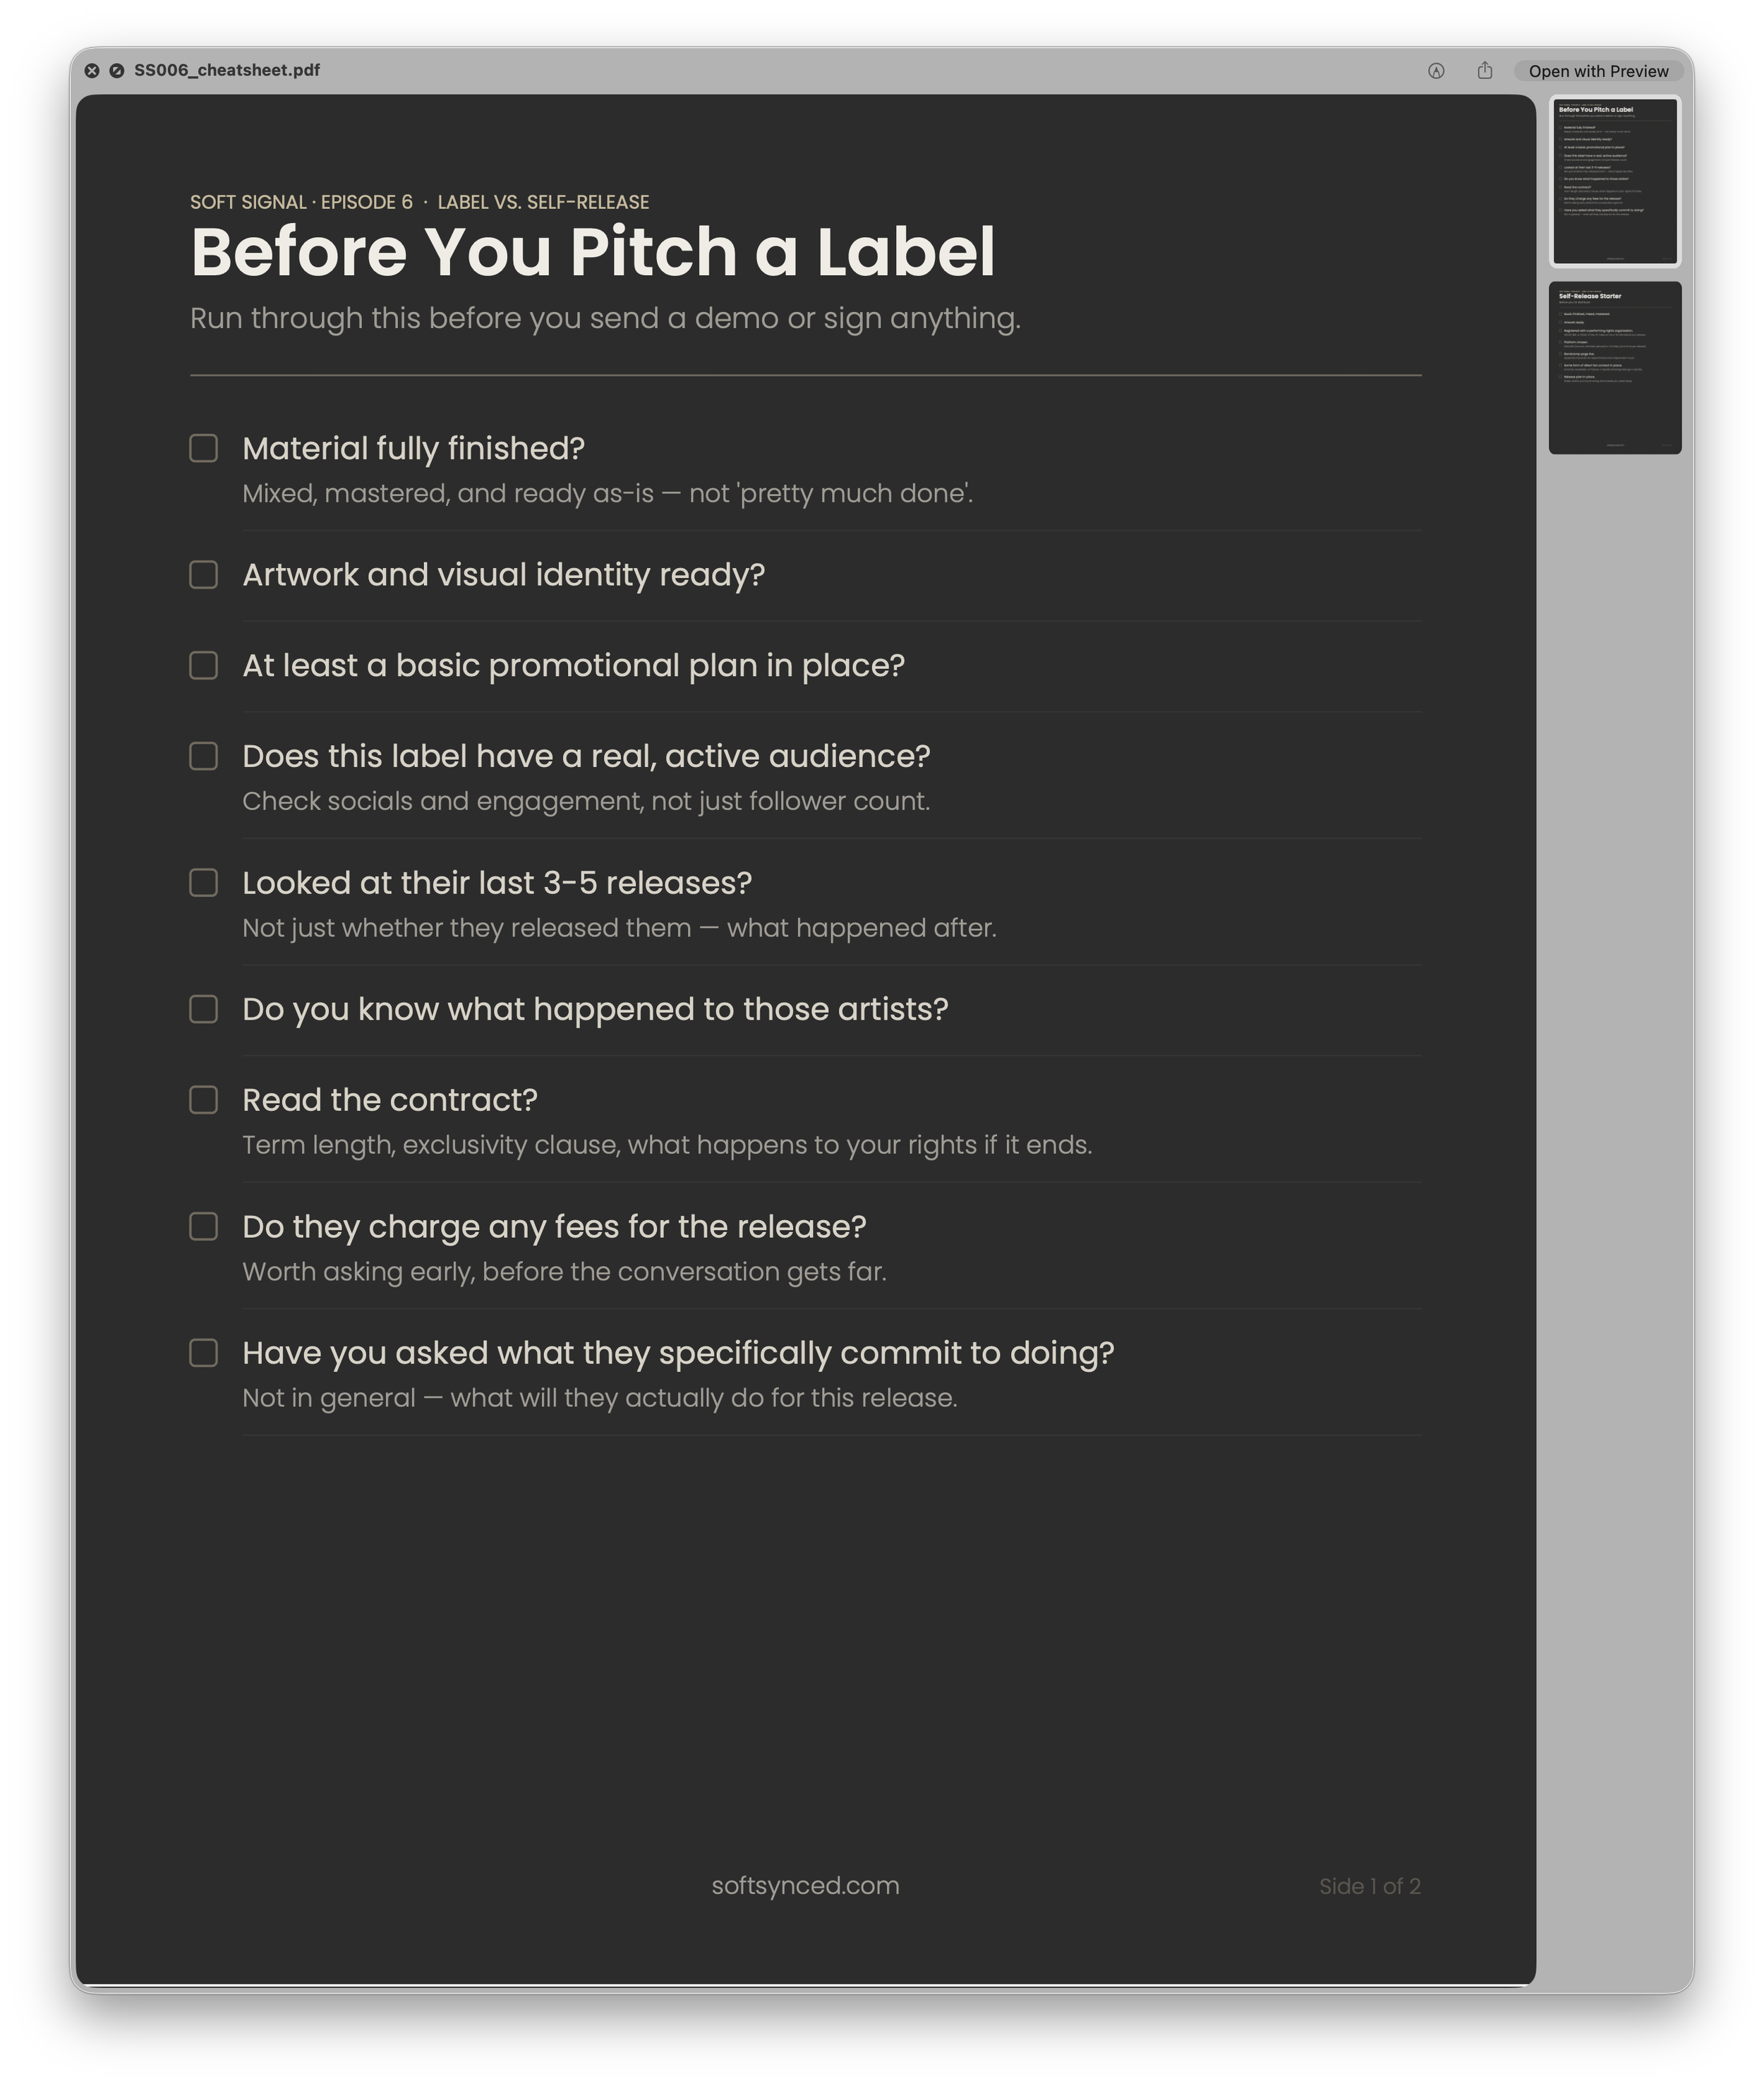
This is a two-sided reference sheet from Soft Signal Episode 6, co-authored by AMB and Virtual Miracle. Side one walks through nine things worth knowing before you pitch a label or sign anything — from whether your material is actually finished to what's in the contract. Side two covers the seven things worth having in place before you self-release.
Both paths require most of the same work. This checklist covers the parts that are easy to skip.
By the time a track reaches mastering, the mix has already been rendered down to a stereo file. The individual elements are combined into one signal. Every decision made at the mastering stage happens to everything at once. There is no isolating the bass from the vocal, or the snare from the reverb. Mastering works with what it receives.
Understanding what each stage of the chain is actually doing — and when it's warranted — changes how you use it. Reaching for a multiband compressor because it's in the chain is different from reaching for it because a specific frequency band is behaving differently from the rest. The same goes for saturation, stereo width processing, and the limiter.
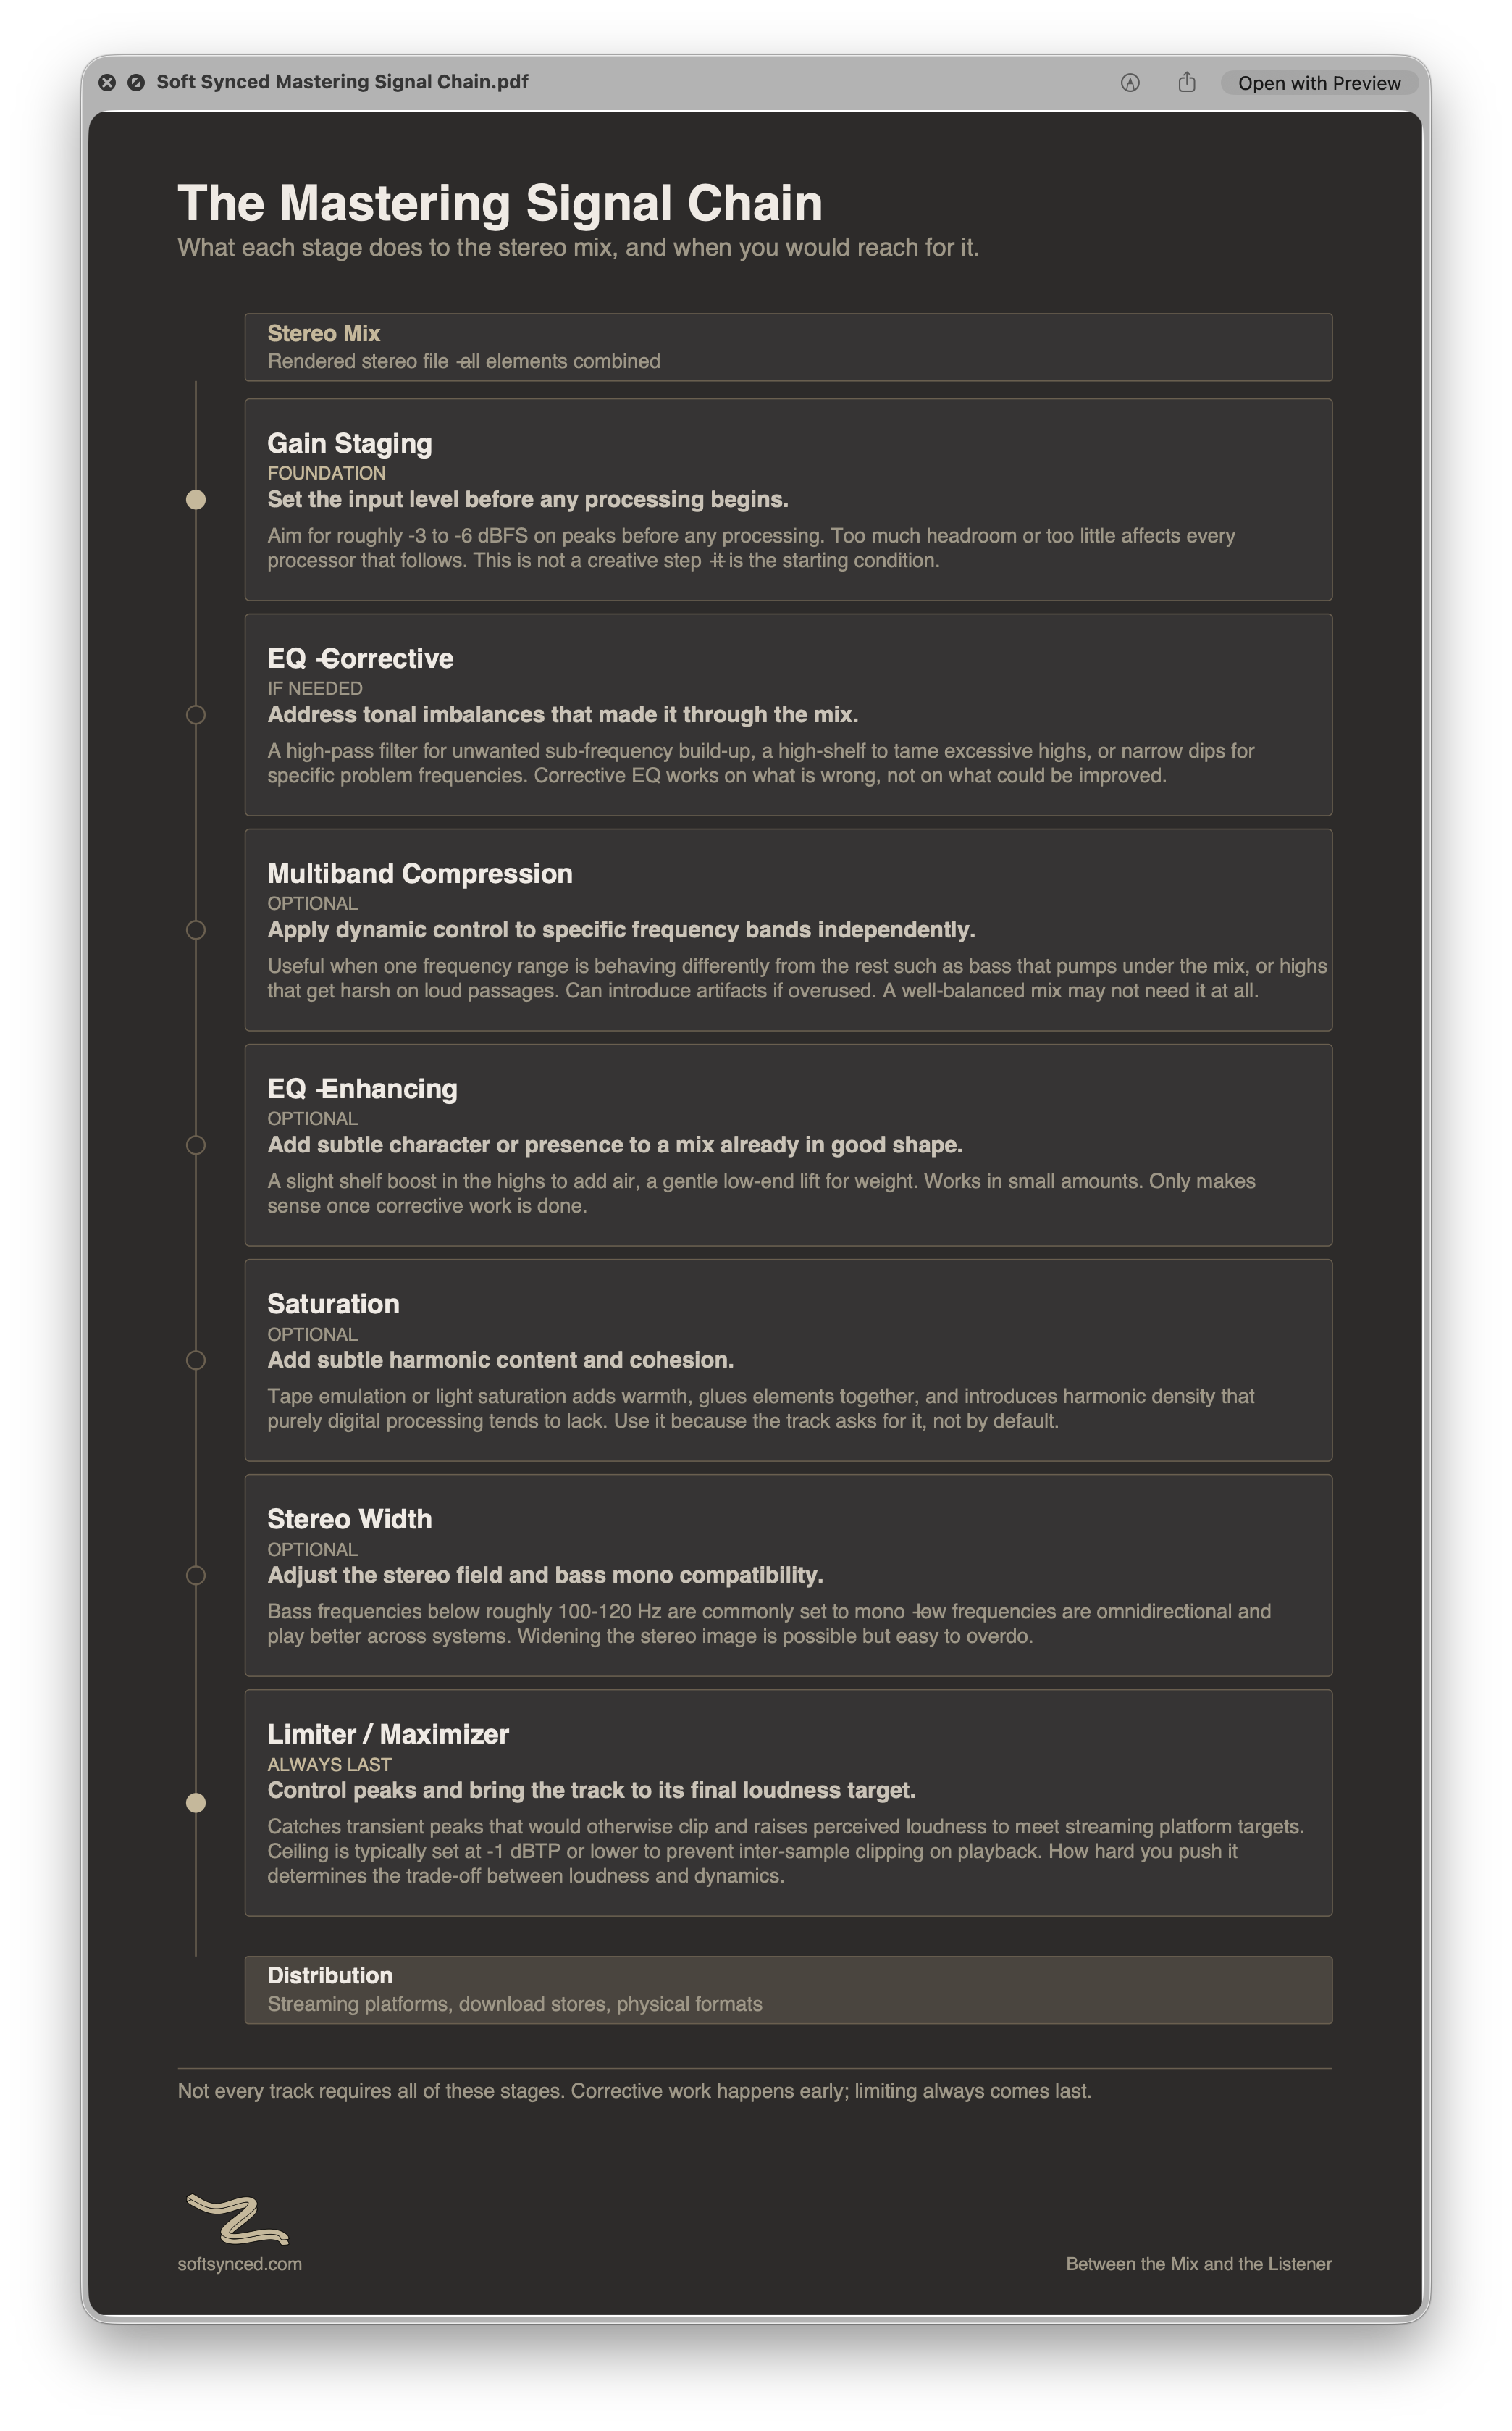
This chart maps the signal chain from stereo mix to distribution: gain staging, corrective EQ, multiband compression, enhancing EQ, saturation, stereo width, and limiting. Each stage is labeled by what it does to the signal and tagged by when you would actually reach for it — foundational, if needed, optional, or always last.
The distinction between corrective and enhancing treatment runs through the whole chain. Some tracks arrive needing correction. Others are already in good shape and only need a light enhancing pass. Most need some of both. The chain is the same either way, what changes is how much of it you actually use, and how hard you push each stage.
Not every track needs every stage. This chart is designed to help you make that call rather than defaulting to a full chain regardless of what the material asks for.
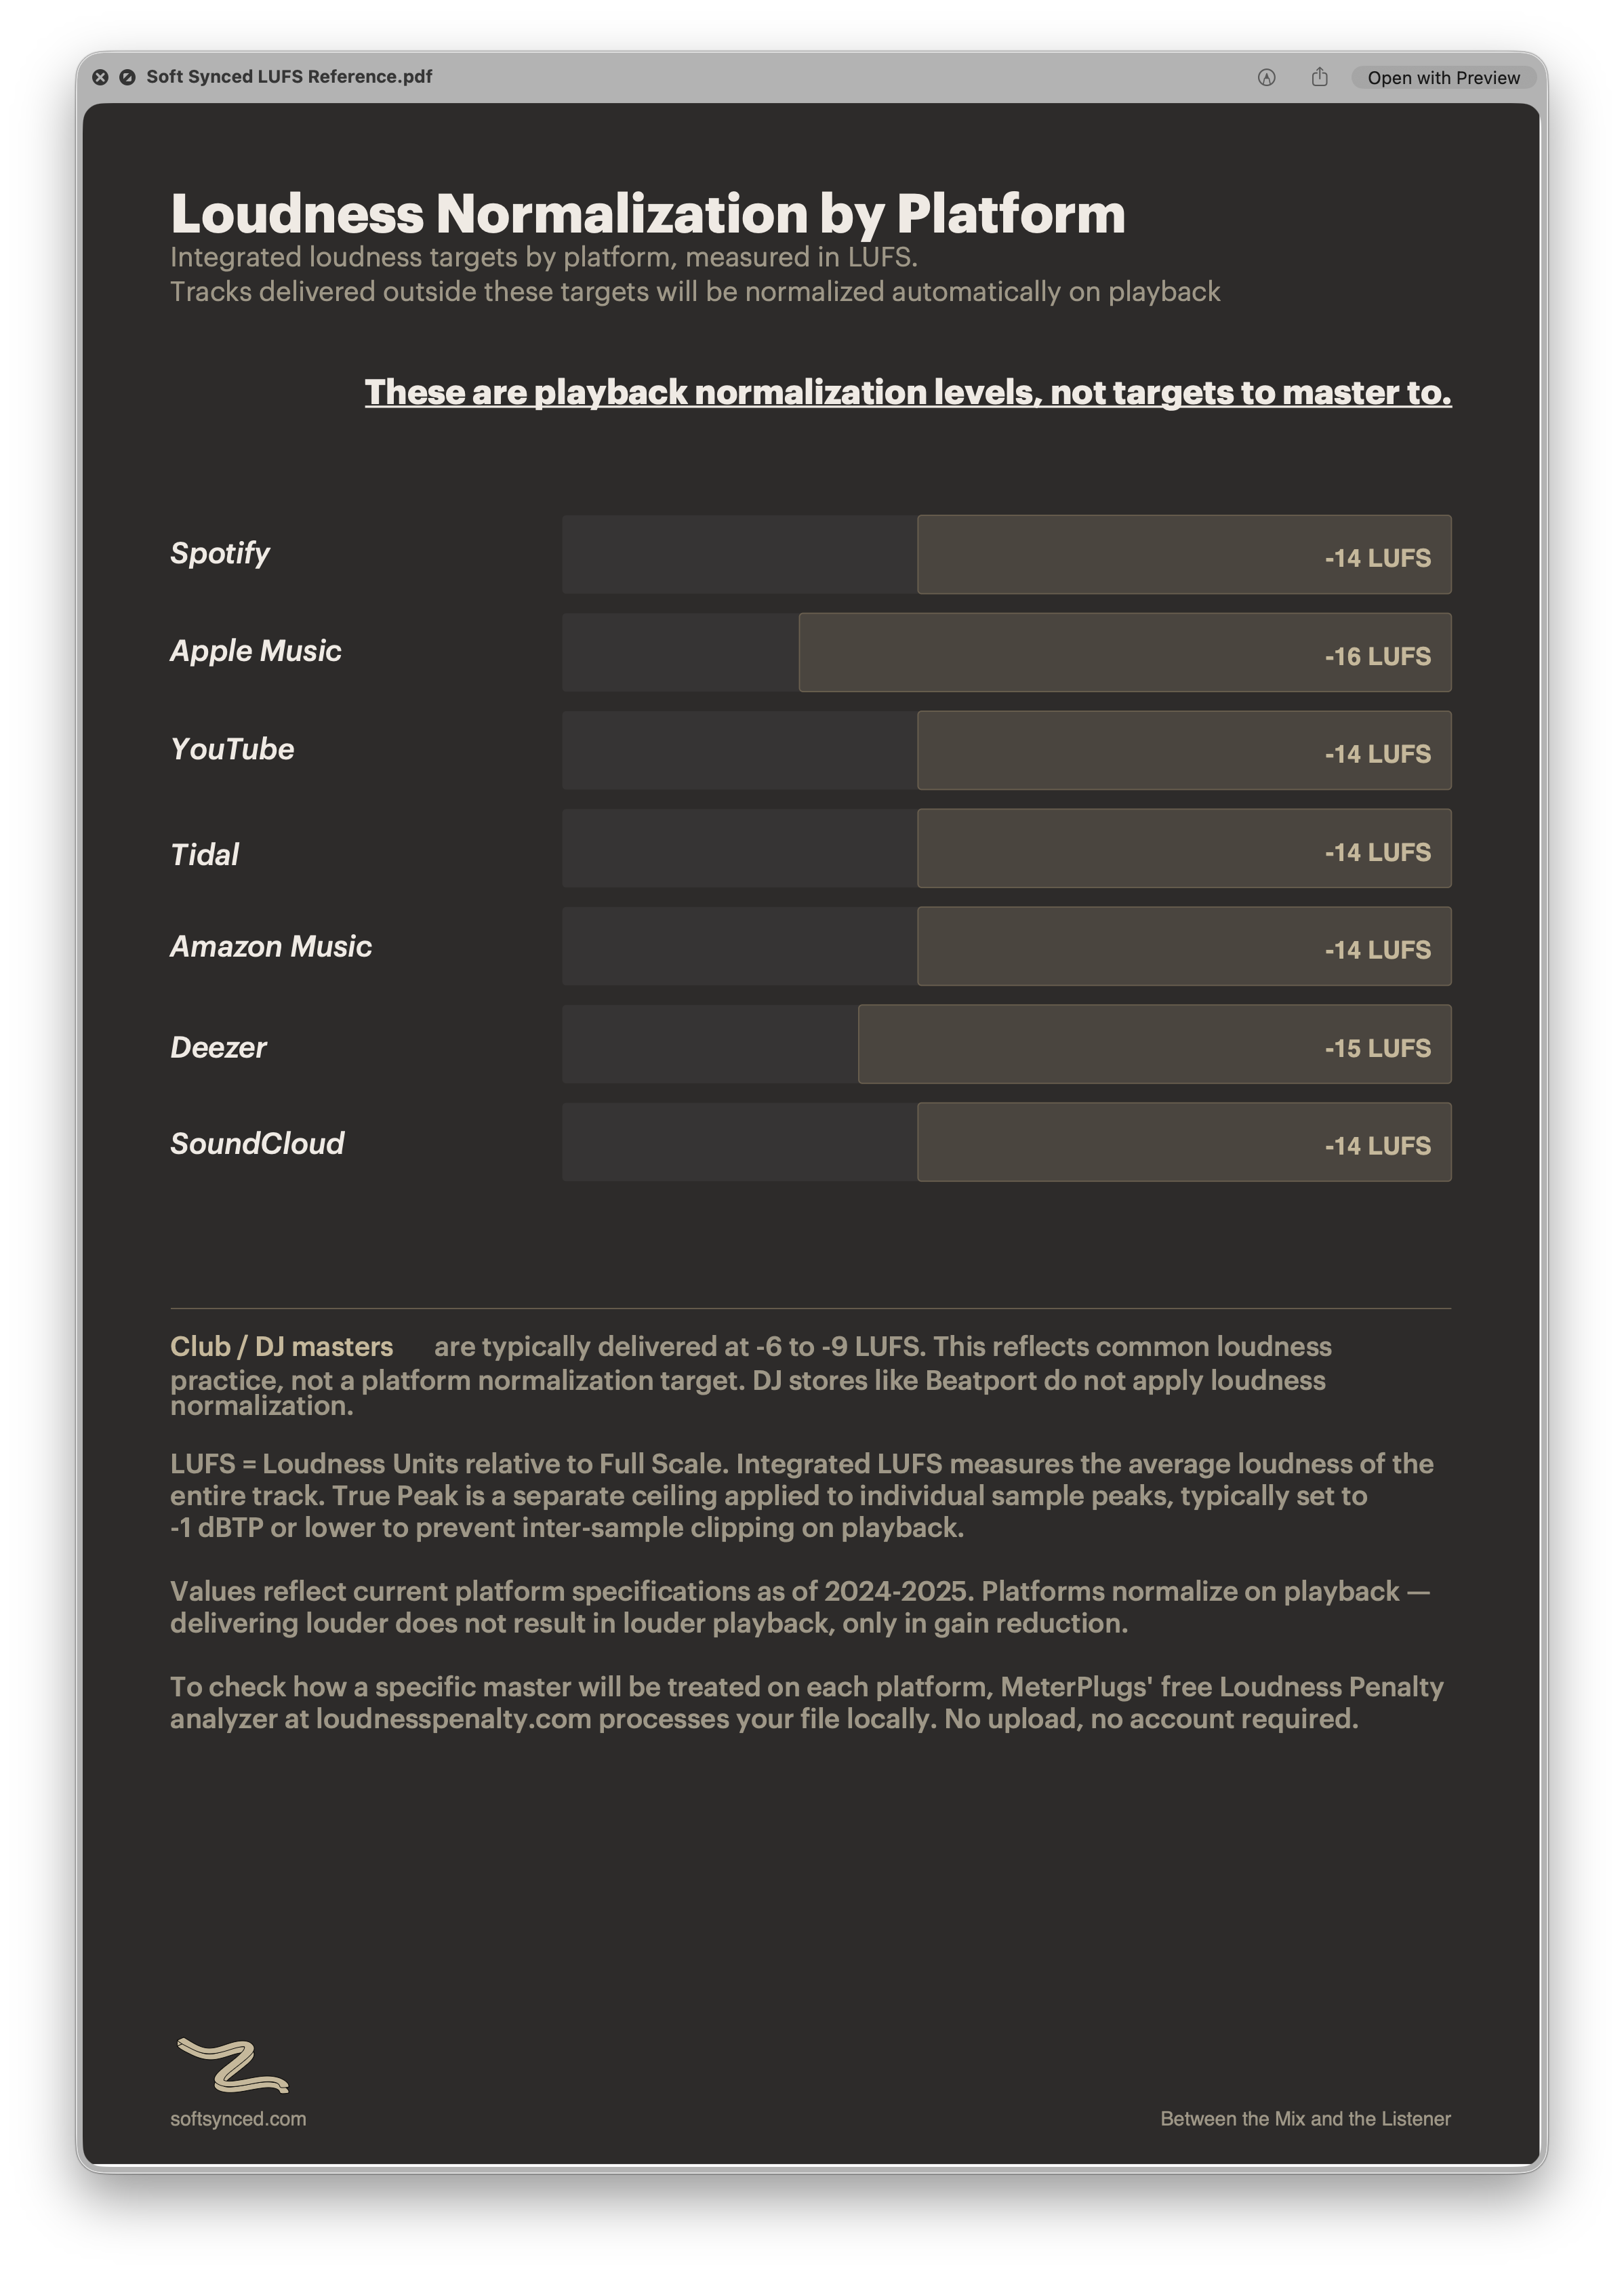
Every major streaming platform normalizes playback to a loudness level measured in LUFS. Tracks that arrive above that level get turned down. Tracks that arrive below it may be turned up within available headroom. Delivering a louder master does not result in louder playback but in gain reduction.
These numbers are not targets to master to. They describe how playback is adjusted.
Knowing how normalization works changes how you approach the final stage. Instead of chasing maximum loudness, you’re deciding how your track behaves once it gets turned up or down.
This chart shows the playback normalization levels for Spotify, Apple Music, YouTube, Tidal, Amazon Music, Deezer, and SoundCloud, along with typical True Peak ceilings. True Peak is separate from integrated loudness — it controls individual sample peaks, and setting it at -1 dBTP or lower helps prevent inter-sample clipping during encoding.
The chart also includes a note on Club and DJ masters, where the context is different and normalization does not apply. Treating Beatport the same as streaming platforms leads to the wrong decisions.
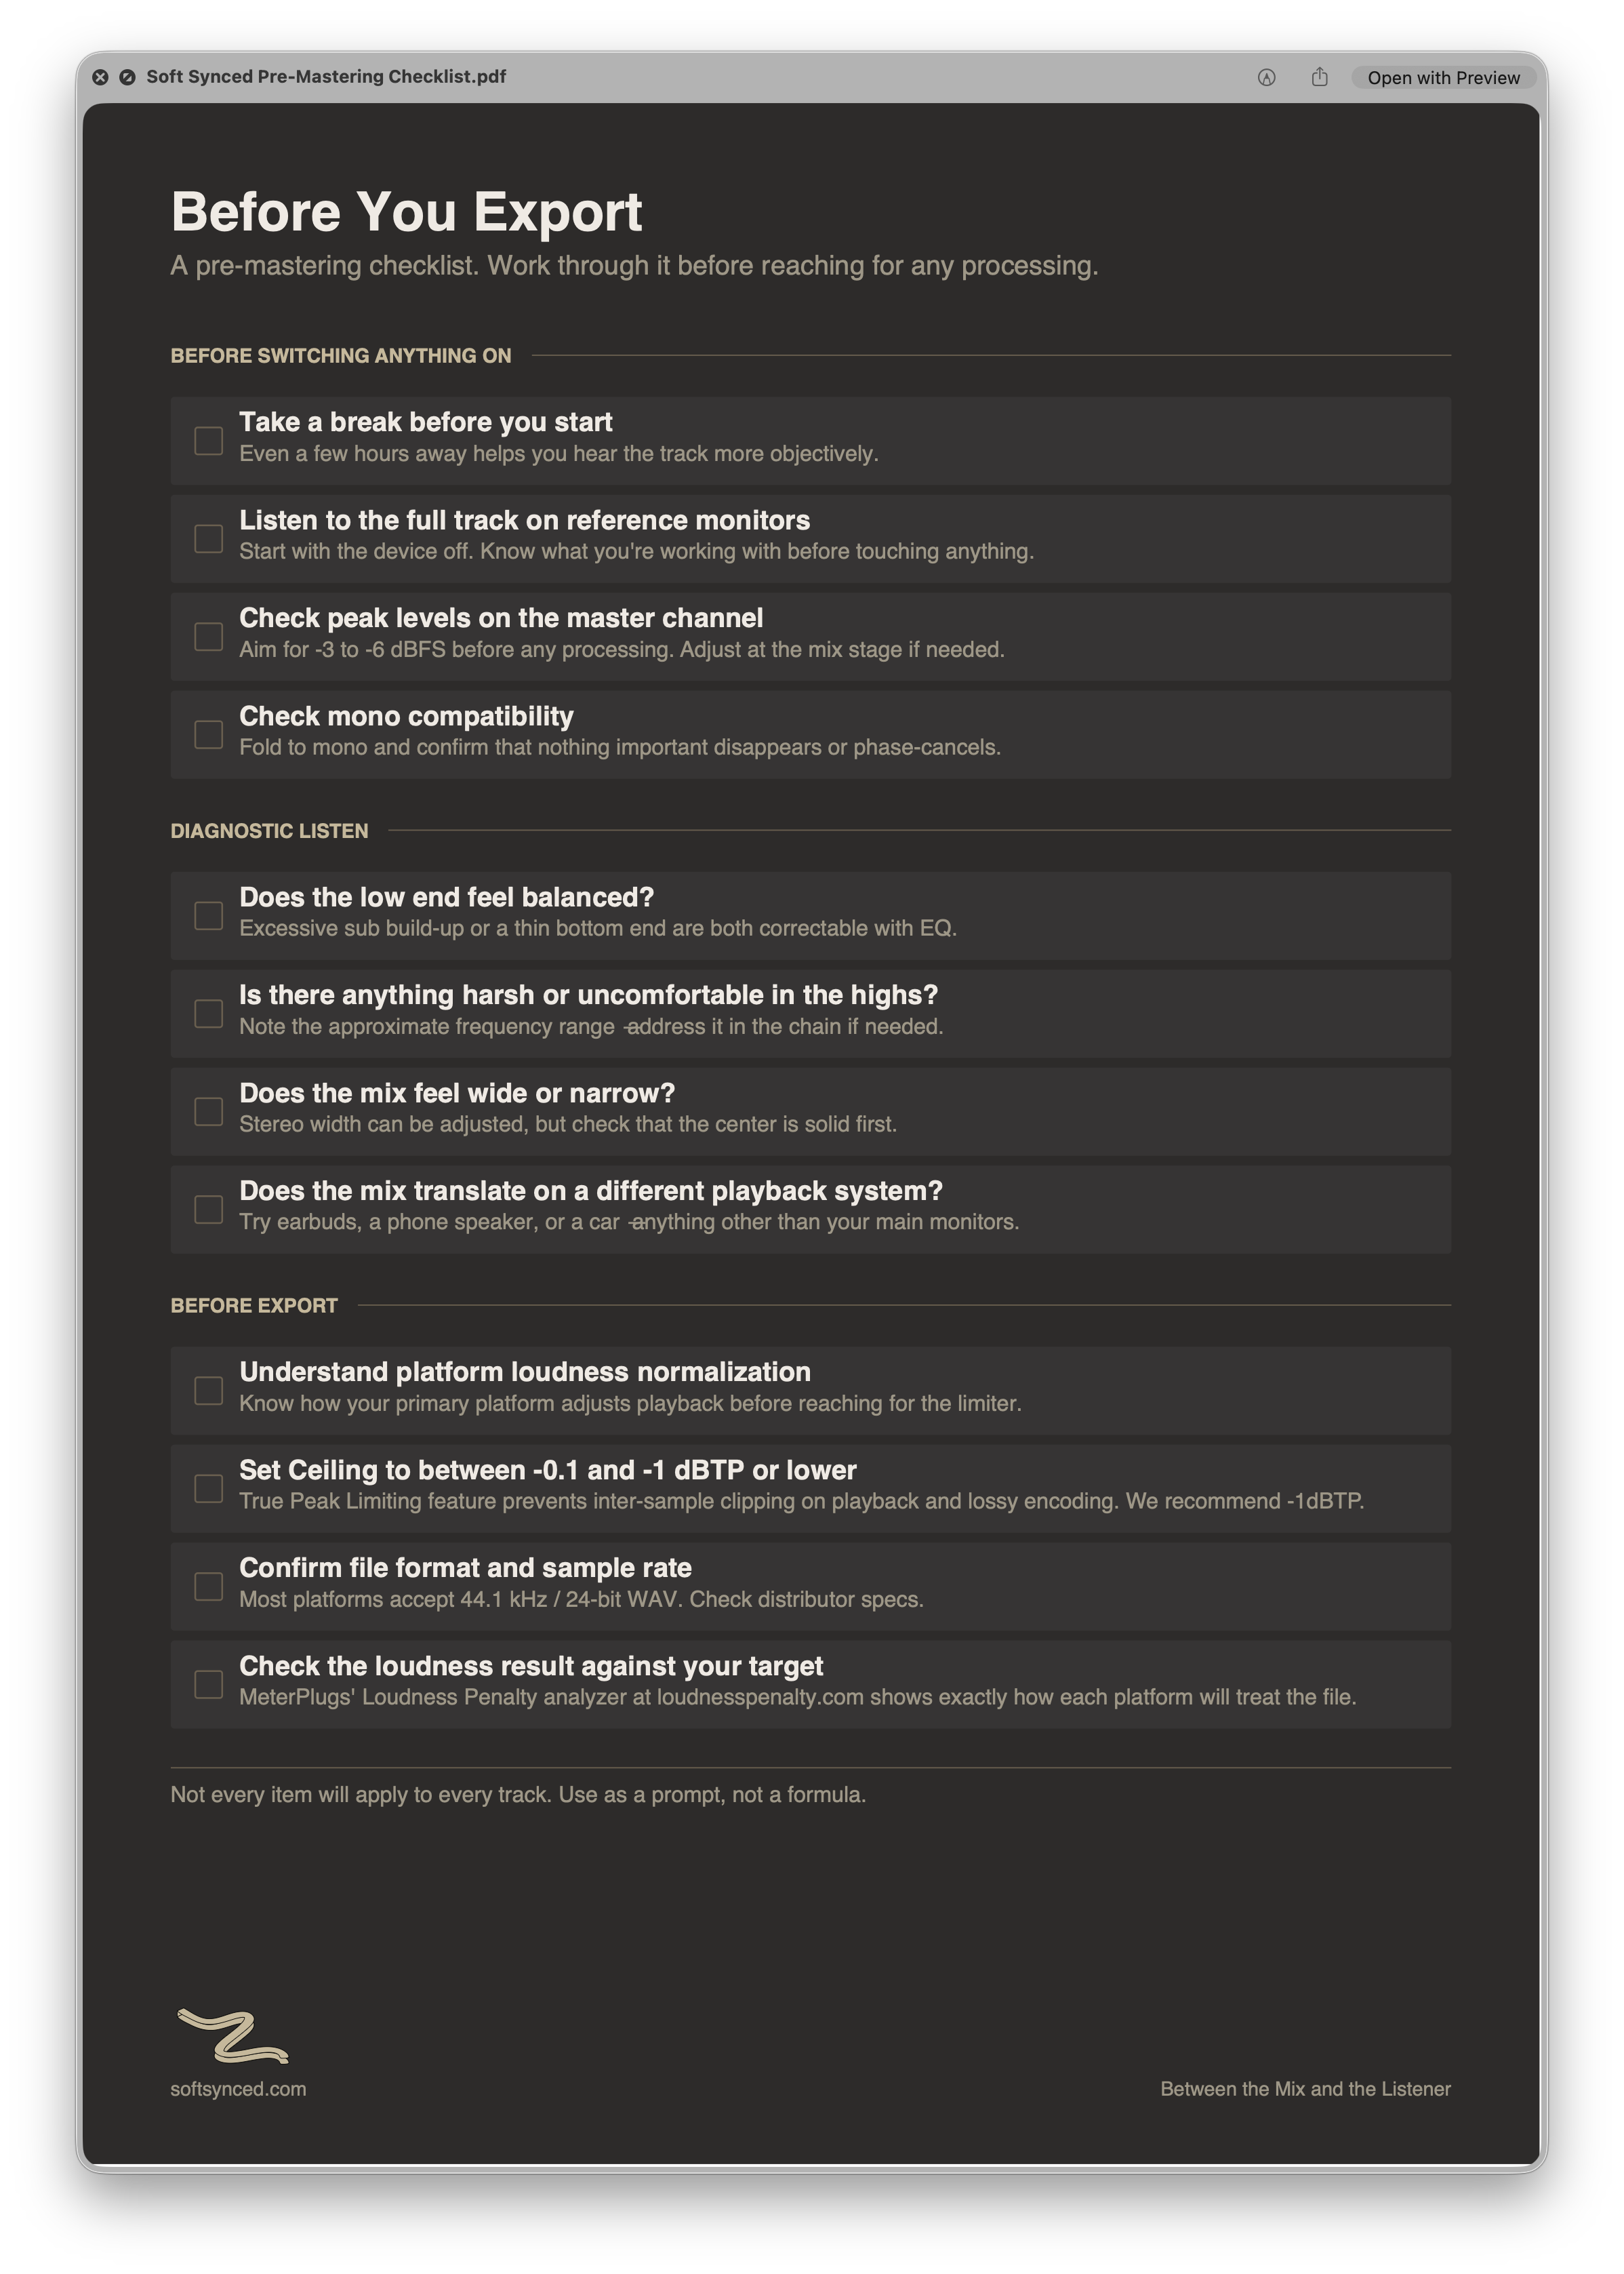
There is a pass worth doing before you touch any processing, a diagnostic listen that tells you what the track actually needs at the mastering stage. Skipping it means making decisions without knowing what problem, if any, you're solving.
This checklist covers that pass in full. Twelve items across three stages: what to check before switching anything on, what to listen for during the diagnostic pass, and what to confirm before export.
The first stage covers the basics that affect everything that follows, taking time away from the mix before starting, checking peak levels on the master channel, and verifying mono compatibility. A mix that phase-cancels significantly in mono has a problem that no amount of mastering will fix.
The diagnostic listen stage is about identifying what the track needs before reaching for any tools. Low-end balance, high-frequency harshness, stereo width, and translation across different playback systems. A track that sounds right on studio monitors but falls apart on earbuds or a car speaker has a translation problem, and knowing that before you start shapes every decision in the chain.
The pre-export stage covers the technical requirements: platform loudness normalization, recommended use of the True Peak ceiling feature, file format, and a final check against playback behavior using tools like MeterPlugs’ Loudness Penalty analyzer.
Not every item will apply to every track. Use it as a prompt, not a formula. The tools available at the mastering stage are only useful once you know what you're reaching for them to do.
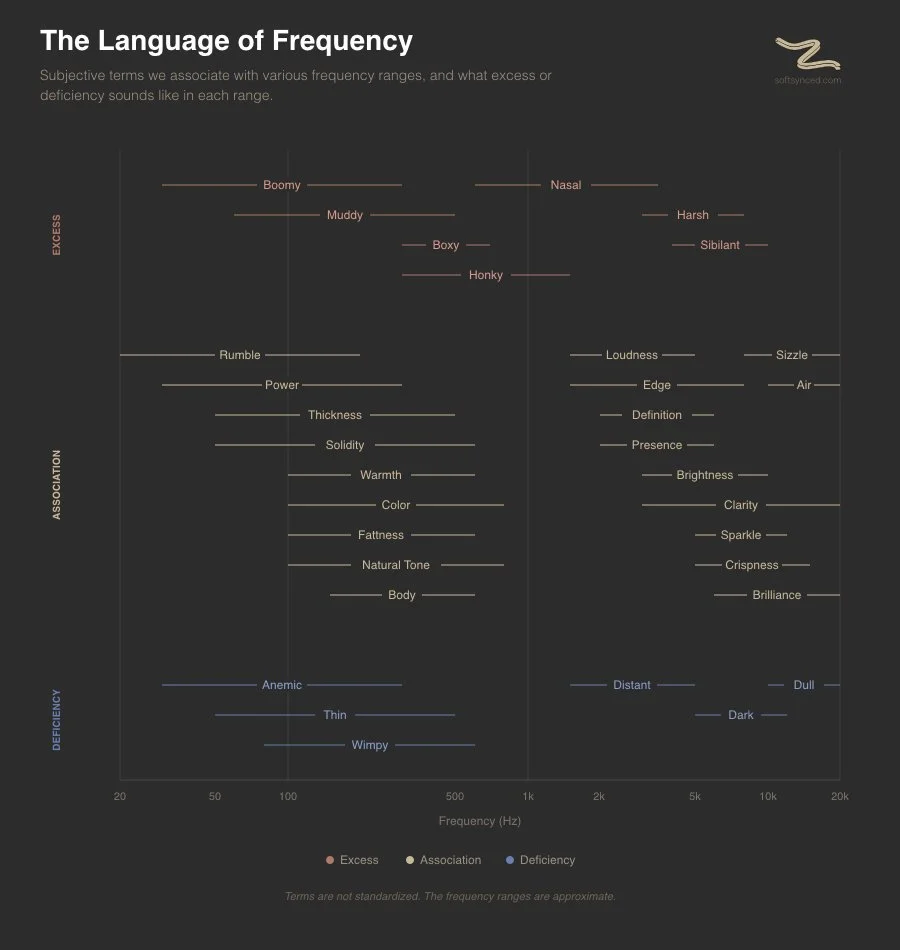
Subjective terms we associate various frequency ranges with, and excess or deficiencies in these ranges.
When someone says a mix sounds "boxy," they're talking about roughly 300–800 Hz. "Nasal" points to the 1–3 kHz zone. "Muddy" lives around 100–300 Hz. "Air" is up past 10 kHz.
These aren't standardized terms, different engineers use them slightly differently, and the exact frequencies shift depending on the instrument. But the general map is consistent enough to be useful as a shared language.
Roey Izhaki's Mixing Audio includes a chart that organizes these terms by what you hear when there's too much of a frequency range (excess), what you associate with it at normal levels, and what it sounds like when it's missing(deficiency). It's one of the most practical reference charts in any mixing book.
You don't need to memorize it. Just start connecting words to ranges. Once "harsh" means 4–8 kHz to you instead of just a feeling, you can act on it faster.
As Izhaki explains:
Izhaki, Roey. Mixing Audio: Concepts, Practices, and Tools (p. 230). (Function). Kindle Edition.

The Core Track is a structured path through music production decision-making, from how you set up your environment to how you carry an idea through to a finished beat.
It's built as a sequence. Thirty lessons across three courses, each one designed to be short enough to complete in a session and specific enough to apply the same day. The work doesn't stay in the app, lessons move into the studio and into the workbook, where the thinking gets captured away from the screen.
The three courses cover orientation, technical foundations, and beat making. By the end you won't just have watched someone else produce. You'll have made decisions, documented your process, and built a working understanding of how you work.
No results match your search. Try removing a few filters.
